File Formats
We prefer PDF files by default. Most design programs have the ability to either export or save file as a PDF. But please take note there are technical aspects of saving a file as a PDF, see some of the sections below (Color Modes, Bleeds) to make sure your file is created and saved properly.
Also acceptable:
.AI – Adobe Illustrator. Convert all fonts to outlines and embed any linked graphics.
.INDD – Adobe InDesign. Use the “Package File” option and send us the folder containing the file, images and fonts.
.PSD – Adobe Photoshop. Create files at 600 dpi, flatten your layers before submitting your files.
.JPG or .JPEG – Photographic images. Not ideally a great print format, but may be used if at least 600 dpi.
We will NOT accept Word, Publisher or Powerpoint files for print production. You may convert these files to PDF, but please see information below regarding color settings. We can accept Excel files for data merge purposes only.
Bleeds
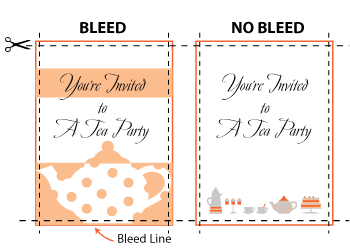
Does your artwork contain images, graphics or background colors that extend to the very edge of the finished piece? This is called “bleed.”
Artwork with bleeds must have an extra 1/4″ of the background image or color added on all four sides beyond the trim line. Example: if you are ordering an 8.5″ x 11″ item, the file size should 9″ x 11.50″ after saving as a PDF. (The outer 1/4″ will be trimmed away).
The illustration below shows two invitations. The left invitation features a design with bleed (finished size plus an extra .25″ on each side). The invitation on the right does not.
How do I create bleed in my design?
If you are creating your file in an application such as InDesign or Illustrator, bleed preferences are available in your document setup. Your artboard (or page setup) should be the “trim size” of the printed piece, then add a bleed settings of .25″ to all four sides. Remember, the extra .25″ will be cut off after your piece is printed. When you save/export your file to PDF, be sure to check the box for “include document bleed settings” and also “include crop marks” so we know where you would like your order to be trimmed. Open your PDF after you create it, if it is (per our example above) 8.5″x11″, you did not include the bleed settings. If the PDF is 9″x11.5″ you got it right! There are many online tutorials to help with these settings if you need guidance.
If your file does not contain bleeds, we may be able to add them, but you will be charged for graphic design time required to do so.
Color Mode
Do you need your piece printed in color? Files that contain color text, artwork or images must be saved in four color “CMYK” (Cyan, Magenta, Yellow, Black) color mode. Files submitted in RGB mode or with Pantone colors will be converted to CMYK, causing color shifts as they are not from the same color spectrum. If using design programs, such as Photoshop, Illustrator and InDesign – make sure your file is set to CMYK mode before you start designing. All Microsoft products (Word, Powerpoint and Publisher) create files in RGB, so if your file was created in one of these programs and saved as a PDF, you should expect to see printed colors different from what you saw on your computer screen. For an extra charge, we can print a proof for you to review before we run your entire order.
Some companies have specific colors for their logo (Pantone Colors). These colors, much like paint swatches, are created for printing presses. Liquid inks are mixed to match that particular Pantone color. The digital printing machine that we operate, again, is based on a CMYK process. We will not be able to match Pantone colors EXACTLY, although it does a great job getting close. Our printer has a built-in Pantone library and treats “correctly created files” that use Pantone colors differently than a simple CMYK color conversion. To have a Pantone color in your file, it must be created in Illustrator or Indesign and the swatch name cannot be changed.
Image Resolution
Computer screens display all images at 72 dpi, which is why low resolution images (especially those taken from websites) look great when viewed on your computer. While your computer screen can display low resolution images well, when printed they will look pixelated, blurry or jagged. For best printing results, a resolution of at least 600 dpi is recommended for images or raster-based files. Files with a resolution lower than 300 dpi can be printed, but the results may be unsatisfactory.
Fonts
Are you using vector-based software such as Adobe Illustrator or Adobe InDesign? For vector files, all text should be converted to outlines before creating the file (preferably PDF) for production.
Are you using a raster-based software application such as Adobe Photoshop? Simply flatten the image. Avoid font sizes smaller than 8 pts or fonts that are very narrow as these may not print well, will lack crispness, or may not display well against dark backgrounds.
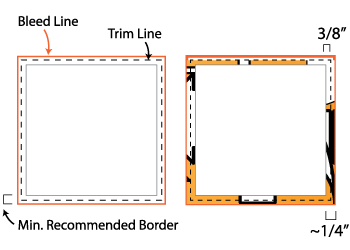
Borders
Does your piece contain a graphic or artistic border close to the paper edge? When trimming paper, there is a cutting tolerance of 1/16″ which may result in uneven borders. For this reason, we do not recommend borders. However, if they are necessary for your piece, the border should be at least 3/8″ from the edge.
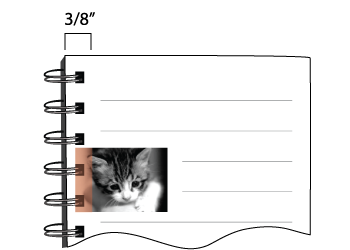
Safety Zone
When creating a booklet or similar piece that requires spiral binding, it is important to be mindful of the safety zone. Printed sheets are punched to accommodate the binding and may interfere with images or text. Establish a “safety zone” of at least 3/8″ from the edge of the final binding edge. (Safety zone must be moved to the right side of the sheet for all back sides if printing double sided pages). To avoid any images or text being cut off when the piece is bound, do not place them in the safety zone.
General notes regarding digital printing
Our digital printing press is basically a very large version of your home printer, it uses black, cyan, magenta and yellow toner. Although it does an amazing job with colors, no printer will match what you see on your computer screen. Files that are created in an RGB (red, green, blue) environment such as Word, Publisher, Powerpoint, and ALL digital photos (which are created in RGB) will be converted to the CMYK color space when printed. Colors may vary greatly from what you expect. This is very typical, especially with blue colors turning purple. If you send us a file that you know or suspect was created RGB, please ask for a printed sample before your order goes into production.